Ansible – Chapter One

Getting started with Ansible is not that simple. If you’re starting from scratch – this could help you. Even today, the documentation isn’t complete and there are some versioning mixups. Here’s what I accomplished in a day or two.

Environment: Amazon EC2 Linux (i.e. CentOS), t2.small.

Installation:

# I tried the other methods. Didn't go as smooth as this.
$ sudo yum install python-pip
$ sudo yum install python-devel
$ sudo pip install ansible

 Paths:

I found no real guidance on this. So I just went ahead and placed everything in /etc/ansible (I work with the default ec2-user). So far it’s Ok (the path, not the user). Here’s a full ‘find’ on my files:

./ansible.cfg       # just one line...
./site.yml          # nothing in here
./filebeat.pb.yml   # first and only playbook!
./hosts             # this is a mighty script!
./roles             # this is how you bundle tasks/steps
./roles/filebeat    # this role installs 'filebeat', a log drain
./roles/filebeat/defaults
./roles/filebeat/defaults/main.yml  # variables
./roles/filebeat/handlers
./roles/filebeat/handlers/main.yml  # will restart the service once in the end
                                    # instead of after any action that asks
./roles/filebeat/tasks              # this is the work
./roles/filebeat/tasks/main.yml     # main just includes the others in order
./roles/filebeat/tasks/start.yml
./roles/filebeat/tasks/configure.yml
./roles/filebeat/tasks/install.yml
./roles/filebeat/templates          # i've also put static files here
./roles/filebeat/templates/etc
./roles/filebeat/templates/etc/filebeat
./roles/filebeat/templates/etc/filebeat/COMODORSADomainValidationSecureServerCA.crt
./roles/filebeat/templates/etc/filebeat/conf.d
./roles/filebeat/templates/etc/filebeat/conf.d/audience.yml
./roles/filebeat/templates/etc/filebeat/conf.d/nodejs.yml
./roles/filebeat/templates/etc/filebeat/conf.d/spark.yml
./roles/filebeat/templates/etc/filebeat/filebeat.yml
./roles/filebeat/templates/etc/filebeat/ssl.crt
./roles/filebeat/templates/etc/yum.repos.d
./roles/filebeat/templates/etc/yum.repos.d/elastic.repo

Inventory

This example shows a dynamic inventory for Amazon EC2. It means that ‘/etc/ansible/hosts’ is a script that takes ‘–list’ as a parameter. In my case, I used a rudimentary python script that simply outputs the instances divided to groups according to a combination of two ec2-tags: <environment>-<role>. Instead of placing AWS API creds in the script or on the host I used a role for the machine. Based on this. I’m no Python expert but here goes:

#!/usr/bin/python

import argparse
import boto.ec2
import simplejson as json

PROD_VPC = 'vpc-nomoreshortnames'
REGIONS = ['us-east-1', 'us-west-2']


def get_ec2_instances_into_hash(region, hash):
    ec2_conn = boto.ec2.connect_to_region(region)
    reservations = ec2_conn.get_all_reservations()
    for res in reservations:
        for inst in res.instances:
            if inst.state == 'running':
                if inst.vpc_id is PROD_VPC:
                    ip = inst.private_ip_address # I use VPN here
                else:
                    ip = inst.ip_address
                env_tag = inst.tags.get('Environment', 'no-env')
                role_tag = inst.tags.get('Role', 'no-role')
                key = env_tag + '-' + role_tag
                if key not in hash:
                    hash[key] = {'hosts': [], 'vars': {}}
                hash[key]['hosts'].append(ip)
                # I have different SSH keys on each set of hosts and all are availale locally
                hash[key]['vars']['ansible_ssh_private_key_file'] = '~/.ssh/' + str(inst.key_name) + '.pem'


def main():
    parser = argparse.ArgumentParser()
    parser.add_argument('--list', help='list inventory', action='store_true')

    args = parser.parse_args()
    instances = {}

    for r in REGIONS:
        get_ec2_instances_into_hash(r, instances)

    print json.dumps(instances, sort_keys=True, indent=4 * ' ')


if __name__ == '__main__':
    main()

The point here is the format of the JSON output. As long as you format like this – you can use whatever script you like.

ansible.cfg

Just this, for smooth SSH-ing:

[defaults]

host_key_checking = False

But I had to add this to ~/.bashrc

export ANSIBLE_CONFIG=/etc/ansible/ansible.cfg

Playbooks

I started by looking at Ansible Galaxy and specifically this example. It didn’t work for me at all but the adjustments I did were really small. So it’s a good start to learn from. If I’m missing anything further down – just return to Steven’s code.

I don’t like the explanations I found about playbooks. I think this eventual example I got to explains it quite well. Please refer to the find output above to know where to place the files. This is how I run the playbook on a single group of hosts:

# From /etc/ansible I run
$ ansible-playbook filebeat.pb.yml --limit smoketest-websockets

The first thing that is read is the playbook file ‘filebeat.pb.yml’ this is “the” playbook. All it does is install and configure one service I use to ship (I like to say drain) logs. So here’s the playbook:

---
- hosts: smoketest-backend
  become: yes
  become_user: root
  roles:
  - { role: filebeat, filebeat_env: smoketest, filebeat_role: backend }

- hosts: smoketest-websockets
  become: yes
  become_user: root
  roles:
  - { role: filebeat, filebeat_env: smoketest, filebeat_role: websockets }

In short; The hosts is what we’ll pull out from the hosts script output. If you don’t want to pull everything from the hosts script and then just use a little you can create different inventory scripts, for example staging, production, tests. And use them with parameter ‘-i staging’. The two ‘become’ statements allow to connect with my default ec2-user but run the installation commands as root. As you can see the ‘roles‘ array allows you to run more than one role per playbook but this a very small example. We run the filebeat role with two parameters filebeat_env and filebeat_role. I specified all of the parameters in use in this role in the defaults yaml: (roles/filebeat/defaults/main.yml)

---
filebeat_ssl_certificate: true
filebeat_logzio_token: secret_token_for_this_nice_service
filebeat_logstash_host: listener.logz.io:5015
filebeat_logstash_tls_certificate_authorities: /etc/pki/tls/certs/COMODORSADomainValidationSecureServerCA.crt
filebeat_env: env_not_set
filebeat_role: role_not_set

I can use these parameters anywhere in the role.

The run starts from ‘roles/filebeat/tasks/main.yml‘ All it does is include for other tasks:

---
- include: start.yml
- include: configure.yml
- include: install.yml

They will run in the order you see them.
Start:
I will probably remove this later, but since I use IP address without DNS I like to print out the hostnames along the way to help me debug, so this is all it does eventually. There must be a smarter way…

---
- name: Get name
  shell: hostname
  register: hostname
  # we restart anyway
  notify: Restart Service | filebeat

- name: Print name
  local_action: command echo item
  with_items: '{{ hostname.stdout_lines }}'

What it does is run the ‘hostname’ command, register this command for debugging and stuff and calls notify which I’ll talk about later. The second part uses the recorded output of the ‘hostname command and prints it out locally on the server I’m running from. This looks bad and will also have an undesired side effect of registering a “change” on every run which not idempotent. You’ll see it in the output. Ok for debugging, bad for production.

Configure:

I’m not going to explain much:

---
- name: Upload SSL | filebeat
  template:
    src: etc/filebeat/COMODORSADomainValidationSecureServerCA.crt
    dest: /etc/pki/tls/certs/COMODORSADomainValidationSecureServerCA.crt
    owner: root
    group: root
    mode: 0600
  notify: Restart Service | filebeat
  tags:
    - configuration
    - template-configuration
    - filebeat

- name: Upload yum repo file | filebeat
  template:
    src: etc/yum.repos.d/elastic.repo
    dest: /etc/yum.repos.d/elastic.repo
    owner: root
    group: root
    mode: 0644
  tags:
    - configuration
    - yum-repo
    - filebeat

- name: Create /etc/filebeat directory
  file: path=/etc/filebeat/conf.d state=directory mode=0755

- name: Upload main config | filebeat
  template:
    src: etc/filebeat/filebeat.yml
    dest: /etc/filebeat/filebeat.yml
    owner: ec2-user
    group: ec2-user
    mode: 0664
  notify: Restart Service | filebeat
  tags:
    - configuration
    - template-configuration
    - filebeat

- name: Upload nodejs logs config | filebeat
  template:
    src: etc/filebeat/conf.d/nodejs.yml
    dest: /etc/filebeat/conf.d/nodejs.yml
    owner: ec2-user
    group: ec2-user
    mode: 0664
  notify: Restart Service | filebeat
  when: ( filebeat_role != 'audience' ) and ( filebeat_role != 'spark' )
  tags:
    - configuration
    - template-configuration
    - filebeat

- name: Upload audience logs config | filebeat
  template:
    src: etc/filebeat/conf.d/audience.yml
    dest: /etc/filebeat/conf.d/audience.yml
    owner: ec2-user
    group: ec2-user
    mode: 0664
  notify: Restart Service | filebeat
  when: filebeat_role == 'audience'
  tags:
    - configuration
    - template-configuration
    - filebeat

Just a few highlights:

  • Templates are good for simply copying files, but the directories need to be there upfront. I used the file module for that (it works like ‘mkdir -p’). Templates obviously allow you to put {{ variables }} and even erb like code. The variables are also accessible here.
  • When is the way to have a condition on an action. It will take place only if the condition result is true. As you can see variables are used ‘as-is’ no dollar signs or braces of any kind.
  • Notify calls a Handler. Handlers are there to do the restart (in this case) just once at the end, and only if someone asked for it. If you look at the ugly ‘start’ code you can see I’m calling it anyway, just because I needed it to overcome an unrelated issue.
  • Yumrepo there is already a module for this – but it’s still in beta and I couldn’t get it. So instead I just copied the repo file into place.

Here are the rest of the files (I’m pretty much done explaining).

Install:

roles/filebeat/tasks/install.yml

---
- name: Install Packages | yum
  yum: name=filebeat state=latest
  tags:
    - filebeat
    - software-installation
    - using-yum

- name: Start with system | filebeat
  service: name=filebeat enabled=yes state=restarted


Templates:

Just a partial example to show how I used variables in the template

filebeat:
  prospectors:
    # EB Activity Log
    -
      paths:
        - /var/log/eb-activity.log
      encoding: plain
      input_type: log
      fields:
        logzio_codec: plain
        token: {{ filebeat_logzio_token }}
        environment: {{ filebeat_env }}
        role: {{ filebeat_role }}


If you forgot how to run it eventually then scroll back up or just: “ansible-playbook playbook-file.yml” from the ‘/etc/ansible’ dir.


Customizing Datadog – Agent Check and Monitor

Along with this guide, I created a python check. I soft linked the check audience.py (the name should match the configuration file) to the “checks.d” directory. And the configuration yaml audience.yaml to the “conf.d” directory. To find out where they are located you can run:

$ sudo service datadog-agent info
...
  Paths
  =====

    conf.d: /etc/dd-agent/conf.d
    checks.d: /opt/datadog-agent/agent/checks.d
...


Skipping to the interesting bits, this is the part of the check method that actually does the check:

        try:
            assert cmp(expected_response, resp) == 0
        except AssertionError, e:
            self.event({
                'timestamp': int(time.time()),
                'event_type': 'send_event',
                'msg_title': err_msg,
                'msg_text': 'Expected: %s But got: %s' % (expected_response, resp),
                'aggregation_key': aggregation_key,
                'alert_type': 'error'
            })
            return

        self.log.info("Audience check - OK")
        self.gauge(key, end_time - start_time, tags)


The assert is where I check whether I like the results I got or not. If it raises the exception I will create an event with an alert_type this will allow me to catch this as an Event in Datadog. And I will also be not reporting any data which will eventually create a gap in the gauge graph:

Screen Shot 2016-02-17 at 5.29.12 PM

If the assert goes by Ok we reach the self.gauge() call which reports results, and cancels the error status of the check. Now let’s go the Datadog dashboard and create a graph and a monitor. The graph is simply the key sent to the gauge: ‘audience.monitoring.local_event’ and it looks like this:

Screen Shot 2016-02-17 at 5.33.24 PM.png

The Monitor simply “grep”s out the name of the check (which is unique) and looks for error statuses:

Screen Shot 2016-02-17 at 5.38.47 PM.png

The status is error because we stated that in the alert_type in the event.

That’s it for now.


Kickass CLI menues with bash ‘dialog’

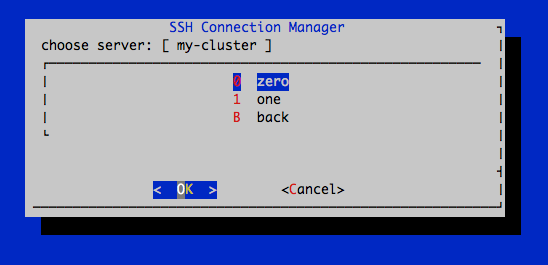
Get really neat blue cli menus though ruby code.

You’ll need to install ‘dialog’ on your linux/mac.

It generally works like this:

dialog --title "My cool cli program" --menu "choose server: [ name-of-menu ]" 0 60 0 0 "zero" 1 "one" B "back" 2>output

Screen Shot 2015-11-10 at 5.25.42 PM
And you read the output from the file output

Dialog has some more cool features, it can cover an entire interactive program, for example https://letsencrypt.org/ uses it for their simple installation/configuration wizard. But I won’t go into that.

Here’s a ruby wrap:

def dialog(title, menu, choises)
  tempfile = Tempfile.new('--lazy--')
  # turns this: ["one", "two", "three"] to this: "1 one 2 two 3 three"
  indexed = ""
  choises.inject(1) { |i,c| indexed += "#{i} #{c} " ; i+1 }
  system("dialog --title \"#{title}\" --menu \"#{menu}\" 0 60 0 #{indexed} B Back 2>#{tempfile.path}")
  if $?.exitstatus != 0
    'e'
  else
    tempfile.read.chomp
  end
end

I use it like this, to pick a server to SSH to: (you’ll want to change the loop)

loop do
  cluster = 'my-cluster'
  server_names = get_servers_names_array(cluster)
  index = dialog("SSH Menu", "Choose server: [ #{cluster} ]", server_names)
  server_name = server_names[index.to_i-1]
  break if index == 'e'
  next  if index == 'B'
  server_dns = get_dns(server_name)
  system("ssh -o StrictHostKeyChecking=no -t user@#{server_dns}")
break

Doing the OpenSSL dance with Ruby

I think I should summarise the move from OpenSSL CLI to Ruby. General purpose here is to

  1. Generate CSRs
  2. Sort and store certificates and intermediate certificates (aka “chains”)
  3. Upload server certificates to AWS

I’ll also provide short explanations and reference to the CLI.

If you already know about OpenSSL and Ruby then you should check out Mitfik‘s example.

Creating a CSR

A CSR is a certificate signing request. When you ask a Certification Authority to issue a certificate for you, they need to validate your identity and the fact you own the domain you want in the CN field. Beside from that, they need the CSR to sign. The CSR is produced by an OpenSSL command, you need to create a private key (and keep it very very safe) and to fill in some data and then you get the CSR. The CSR is not secret, it’s actually a public key. The certificate you will eventually buy is not secret either. But the private key you produced is VERY secret. Guard it well. If you lose it – the certificate is worthless. And if someone else gets it – they can run the perfect phishing/pharming attack on your site.

Here’s how you issue a CSR and a private key in a single shell command: (full documentation)

$ openssl req -nodes -newkey rsa:2048 -keyout my-domain.com.2015.key -out my-domain.com.2015.csr -new -subj "/CN=my-domain.com/OU=My Organization Unit/C=US/ST=MA/L=Boston"
Generating a 2048 bit RSA private key
....................................+++
..................................................................................................+++
writing new private key to 'my-domain.com.2015.key'
-----
$ ls -1 my-domain.com.2015.*
my-domain.com.2015.csr
my-domain.com.2015.key

If you are not automating anything, it’s all you need. If you want to sign the certificate yourself, use this guide.

For Ruby, we’ll first have to look a bit deeper on:

encoding and fields

Turns out, SSL certificates support more than just plaintext. I was really disappointed about this. In my utopia there are only 256 ASCII characters, one fixed width font, and one encoding named plaintext. Anyhow, the fields in the CSR and the Certificate are very flexible. They are determined by the configuration of the CA. So generally it’s like this:

  • Your CN (Common Name) field is the domain you are authorizing with the certificate. This should be plaintext or in this case
    OpenSSL::ASN1::PRINTABLESTRING
  • The rest of the fields can be whatever you want. In my view they should be without and UTF8 decorations, but UTF8 is supported with the encoding:
    OpenSSL::ASN1::UTF8STRING
  • Have a look at some certificates in sites of respectable companies and try not to invent the wheel.

Ruby

require 'openssl'

RO_PERMISSIONS = 0400

def create_key_file(path, bits = 2048)
  key = OpenSSL::PKey::RSA.new bits
  File.open(path, "w", RO_PERMISSIONS) { |f| f.write key }
  key
end

def load_key_file(path)
  OpenSSL::PKey::RSA.new File.read(path)
end

def load_csr_file(path)
  OpenSSL::X509::Request.new File.read(path)
end

# I use this to make sure the key-csr-cert match
# works for CSR, RSA and X509 objects
# note you need to provide the OpenSSL object
# it supports the public_key method
def get_modulus_first_line(key)
  key.public_key.to_text.split("\n")[2].strip
end

# path = file path
# key = private key object
# subject = hash of subjet fields, empty strings are ok
# { "CN" => "site.com", "ST" => "NY" ,... }
def create_csr_file(path, key, cn, fields)
  request = OpenSSL::X509::Request.new
  request.version = 0
  mapped_subject = fields.map do |k,v|
    if k == "C" # Country as plaintext, good practice that's all
      [ k, v, OpenSSL::ASN1::PRINTABLESTRING ]
    else
      [ k, v, OpenSSL::ASN1::UTF8STRING ]
    end
  end
  mapped_subject << [ "CN", cn, OpenSSL::ASN1::PRINTABLESTRING ]

  request.subject = OpenSSL::X509::Name.new(mapped_subject)
  request.public_key = key.public_key
  request.sign key, OpenSSL::Digest::SHA256.new
  File.open(path, "w", RO_PERMISSIONS) { |f| f.write request }
  request
end

Intermediate certificate – chain

This is concept you need to make sure you understand! Else your server certificate may not work well and not have the fancy green key or background like you expected it to. Examples:

redkey greenkeyyellowkey

The last one is the one you’ll probably see if you are missing a chain. This is what it means: “The website has a signed certificate for the domain it is using, but your browser does not identify the signer of the certificate (CA) as a trusted CA”.

It works like this: There are about 300 globally trusted root CAs. It means that there are currently 300 certificates that we all decided to trust. They are embedded in your SSL stack, both in your browser and your OS. When using esoteric browsers or OSs, or very old ones, you might have issues sometimes, but if you follow the mainstream – you’re fine. These are the foundations of TLS and secured browsing.

Now the lovely CAs don’t want to do all the heavy lifting alone so they delegate their authority and let others sign certificates for them, they can delegate again too. Eventually each link has an intermediate certificate saying who allowed them to sign certificates. When you present in your website a certificate that was not signed by a root CA you must also supply the certificate of whoever signed yours, and the one who signed theirs all the way up to a root CA that any browser would know. Therefore – chain. Each certificate has a field called “Subject”, it includes the details of the entity who uses that certificate, e.g. You, your domain. It also has an “Issuer”, the entity who signed the certificate. Here’s a random diagram I found:

How a certificate is authenticated by validating the chain certificate

Technically speaking, on a typical Linux web server, you need to configure the path of the private key file and the path to the certificate file. The certificate file should include your certificate, followed by the first link of the chain (another certificate) followed by the next link in the chain, all to way to a root CA. You don’t need to include the root CA certificate, but you can. This is a very delicate file, newlines matter, and the BEGIN and END lines matter too.

Note: If you run OpenSSL commands on  a file with several certificates, it will only read the first one.

If you don’t know where the intermediate certificate is, don’t worry, they are very easy to find online, just google the “Issuer” of the certificate you hold:

$ openssl x509 -in www.my-domain.com.2015.crt -text | grep "Issuer:"
 Issuer: C=US, ST=Arizona, L=Scottsdale, O=GoDaddy.com, Inc., OU=http://certs.godaddy.com/repository/, CN=Go Daddy Secure Certificate Authority - G2

I hope this was enough, took me a while to get a hold on this topic. Good luck.

Splitting a file that has several certificates in it (Ruby)

certificates = certificate_chain_text.split(/-+BEGIN.*?-+/).delete_if{ |c|
  c.length == 0
}
x509_certs = certificates.map { |c| 
  OpenSSL::X509::Certificate.new('-----BEGIN CERTIFICATE-----' + c) 
}

Getting the fields from a certificate in a website

I use this to help customers issue new certificates when they are not sure how the original ones where made.

# works only for sites that allow it
def subject_from_web_url(url)
  tcp_client = TCPSocket.new(url, 443)
  ssl_client = OpenSSL::SSL::SSLSocket.new(tcp_client)
  ssl_client.connect
  cert = OpenSSL::X509::Certificate.new(ssl_client.peer_cert)
  ssl_client.sysclose
  tcp_client.close
  cert.subject
end

Uploading a certificate to AWS (server certificate)

Assuming you have an API user with IAM credentials that allows uploading server certificates. Using AWS SDK version 2.*.

require 'aws-sdk'
require 'openssl'

@conf = your_conf_hash # access keys, cert, cert name for aws, etc.

@iam = Aws::IAM::Client.new(
  region: 'us-east-1', # doesn't really matter for IAM
  access_key_id: @conf['access_key_id'],
  secret_access_key: @conf['secret_access_key']
)

if @iam.list_server_certificates.server_certificate_metadata_list.any? do |s|
  s.server_certificate_name == @conf["name"] 
end
  raise "Name #{name} is already in use, cannot create a new certificate with the same name"
end

# note I only use the OpenSSL constructors for formatting and validation
cert   = OpenSSL::X509::Certificate.new(@conf["cert_text"]).to_s
key    = OpenSSL::PKey::RSA.new(File.read(@conf["key_path")).to_s
chain  = @conf["chains"].map { |c| OpenSSL::X509::Certificate.new(c["cert_body"]).to_pem }.join

upload = @iam.upload_server_certificate(
  server_certificate_name: @conf["name"],
  certificate_chain: chain,
  certificate_body: cert,
  private_key: key
)

puts "Successfully uploaded certificate. ARN: #{upload.data.server_certificate_metadata.arn}"

Verify a certificate was signed by a trusted root CA (Ruby)

# will return true for the last link of a chain
# that was signed directly by a trusted CA
# this uses the TLS stack, the trusted CAs that ship with it.
def verify_direct_ca(cert)
  store = OpenSSL::X509::Store.new
  store.set_default_paths
  x509 = OpenSSL::X509::Certificate.new(cert)
  store.verify(x509)
end

That’s all I can think off currently. Feel free to ask for more examples.

bashrc

Here’s a slight overkill .bashrc or .profile for your shell.

I’ve put in there more than I actually use, just for reference.

Best bit is the “reasonable prompt for servers” which gives you this prompt:

# Reasonable prompt for servers
# I set a different color for each server for distinction
export PS1='\[\e]0;\w\a\]\[\e[32m\][$(date +%H:%M)] \u@\hr:\[\e[33m\]\w\[\e[0m\] \n\$ '

It gives you this prompt:

Shell prompt on a server

The overkill version can show you: time, user, host, ruby version, git branch. And of course the exit code of your last command in red – if it wasn’t zero.

To see all available shades of tput colors:

$ for i in `seq 0 255`; do echo -e "$(tput   setaf $i)example $i $(tput   sgr0)"; done

I’m omitting the result – too gay (not that there’s anything wrong with that)

To see all echo colors: (you really shouldn’t waste your time on this…)

$ for code in {0..255}; do echo -e "\e[38;05;${code}m $code: Test"; done

Full file: (linux)

# .bashrc

# Source global definitions
if [ -f /etc/bashrc ]; then
	. /etc/bashrc
fi

# Functions

function parse_git_branch () {
  git branch 2> /dev/null | sed -e '/^[^*]/d' -e 's/* \(.*\)/ (\1)/'
}

function mkcdir(){ mkdir $@ ; cd $@ ; }

# rvm-prompt supplied with rvm is very slow, here's Dubek's faster alternative:
function __fast_rvm_ps1() {
rubybin=$(command -v ruby)
if [[ "${rubybin/rvm/}" != "$rubybin" ]] ; then
    withoutprefix="${rubybin/*rubies\//}"
    justversion="${withoutprefix/\/*}"
else
    ver=$(ruby --version | cut -d" " -f1,2)
    justversion=$(echo ${ver// /-})
fi
echo "$justversion"
}

# Reasonable prompt for servers (I set a different color for each for distinction)
# export PS1='\[\e]0;\w\a\]\[\e[32m\][$(date +%H:%M)] \u@\hr:\[\e[33m\]\w\[\e[0m\] \n\$ '

# Unreasonable prompt overkill for your local devenv

COLOR_RED="\[$(tput     setaf 1)\]"
COLOR_GREEN="\[$(tput   setaf 2)\]"
COLOR_YELLOW="\[$(tput  setaf 3)\]"
COLOR_BLUE="\[$(tput    setaf 4)\]"
COLOR_PURPLE="\[$(tput  setaf 5)\]"
COLOR_CYAN="\[$(tput    setaf 6)\]"
COLOR_WHITE="\[$(tput   setaf 7)\]"
COLOR_GREY="\[$(tput    setaf 8)\]"
COLOR_PEACH="\[$(tput   setaf 9)\]"
COLOR_LIGHT_GREEN="\[$(tput  setaf 10)\]"
COLOR_LIGHT_YELLOW="\[$(tput setaf 11)\]"
COLOR_LIGHT_BLUE="\[$(tput   setaf 12)\]"
COLOR_LIGHT_PURPLE="\[$(tput setaf 13)\]"
COLOR_LIGHT_CYAN="\[$(tput   setaf 14)\]"
COLOR_LIGHT_WHITE="\[$(tput  setaf 15)\]"
COLOR_BLACK="\[$(tput   setaf 16)\]"
COLOR_RESET="\[$(tput   sgr0)\]"

function prompt_cmd () {
  LAST_STATUS=$?
  PS1="$COLOR_BLUE[\t] "

  if [[ $USER == "root" ]]; then
    COLOR_USER="$COLOR_RED"
  else
    COLOR_USER="$COLOR_CYAN"
  fi

  if [[ $LAST_STATUS != 0 ]]; then
    PS1+="$COLOR_RED"
    PS1+="(rc=$LAST_STATUS) "
  fi

  PS1+="$COLOR_USER"
  PS1+="\u@\h"
  PS1+="$COLOR_WHITE:"
  PS1+="$COLOR_BLUE\w "

# if type parse_git_branch > /dev/null 2>&1; then
#   PS1+="$COLOR_LIGHT_BLUE"
#   PS1+=$(parse_git_branch)
# fi

# if type rvm > /dev/null 2>&1; then
#   PS1+=" <$(__fast_rvm_ps1)>"
# fi

  PS1+="$COLOR_RESET"
  PS1+='\n\$ '
}

PROMPT_COMMAND='prompt_cmd'

# Exports
export CLICOLOR=1
export LSCOLORS=ExFxBxDxCxegedabagacad

# Aliases

alias ll='ls -lG'
alias rm='rm -i'
alias mv='mv -i'
alias vi='vim'
alias vg='vagrant'

export PATH="$PATH:$HOME/.rvm/bin" # Add RVM to PATH for scripting

rake tasks parameters

Just a couple of notes that weren’t’ obvious to me at first:

Here are two tasks, (a) takes an environment variable, (b) takes two command line arguments:

namespace :do do
  desc "task a, takes env param P"
  task :task_a do
    if ENV["P"]
      puts "got param from evn: #{ENV["P"]}"
    else
      puts "got nothing"
    end
  end

  desc "task b, takes params name and id"
  task :task_b, [:name, :id] do |task, args|
    puts "Task #{task} Got name: #{args[:name]} and id: #{args[:id]}"
  end
end

Generated task list:

$ rake -T
rake ca:aws_upload[id,name]                # Upload certificate to AWS
rake do:task_a                             # task a, takes env param P
rake do:task_b[name,id]                    # task b, takes params name and id

Usage and outputs:

$ rake do:task_a P=my_param  # got param from evn: my_param
$ rake do:task_b[amir,123]   # Task do:task_b Got name: amir and id: 123